Action disabled: source
meta data for this page
JESS Client User Guide
Version 2.0
The JESS Client is a standalone software tool for submitting jEPlus projects and EnergyPlus simulation jobs to the jEPlus Simulation Server (JESS). This tool can be used alone or be integrated into third-party EnergyPlus front-ends or simulation launchers. This user's guide covers the usage in GUI mode and the command-line options.
Installation
The obtain a copy of JESS Client, please go to Download JESS Client. log-in is not required for downloading this tool.
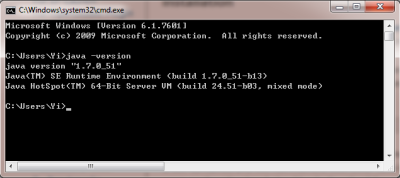
JESS Client requires Java Runtime Environment version 7 (JRE1.7) to be available on your computer. If you are not sure about the availability of Java or its version on your computer, you can check it by issuing the following command in a terminal window.
java -version
For Microsoft Windows users, a JESS Client package including a copy of JRE1.7 is provided in the download area. This package is self-contained and will not interfere with other Java installations or programs on your Windows computer. Linux or Mac users, on the other hand, should only download the standard package (without JRE).
Like other tools in the jEPlus family, the JESS Client is completely portable and does not require “installation”. Simply unpack the downloaded zip file to a folder, and you are good to go. To run the Client in either GUI or command-line mode, you need to use the example launch scripts supplied in the package. For example, to start in GUI mode, double click on “run_gui.bat”.
Use JESS Client GUI
In the GUI mode, you can use the JESS Client to manage server connections and account credentials, to submit jEPlus and EnergyPlus jobs, and to manage the submitted jobs, which is particularly useful for jEPlus projects and long-running E+ jobs. The GUI has four tabs: Server Connection, Job Submission, Job Status and Client Log.
Server Connection
The Server Connection tab is shown in the screenshot below. On this tab, you can specify a server, check its status, check your logon credential for this server, check information associated with your account, and switch accounts.
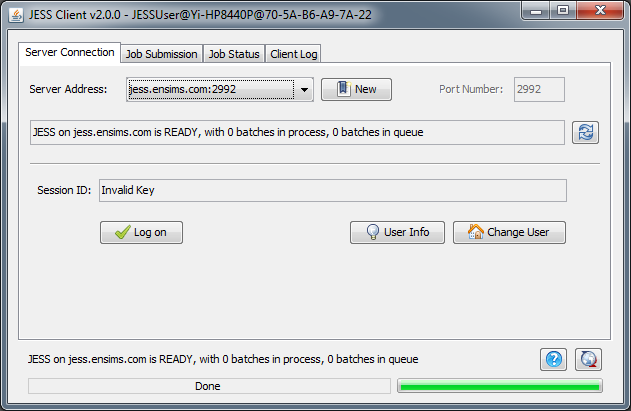
The Server Connection tab
Since v2.0, the Client is set to connect to the JESS Online service at Energy Simulation Solutions Ltd (jess.ensims.com:2992). Should you wish to add a new connection, click on the “New” button next to the Server Address list. The following dialog box will show.
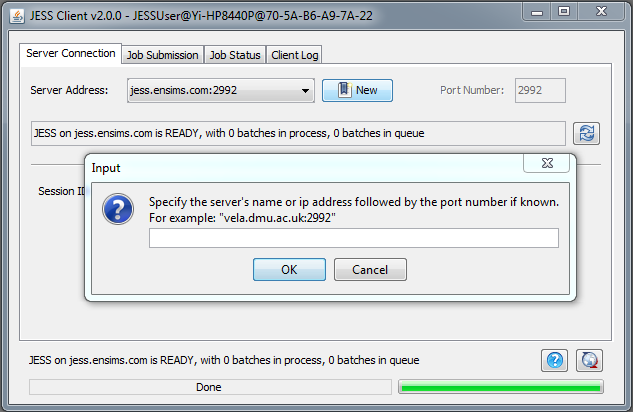
New Server Connection dialog box
You can put in the address for the new server in the form of server.address:port, where port is optional, and if omitted, will default to 2992. For example, to point to the ENSIMS cluster, you can type in either “jess.ensims.com:2992” or “jess.ensims.com”.
User account
User's logon credentials are cached in the client using a Session ID string. If a session ID has not been assigned, or it has expired, clicking on the “Log on” button will display the logon dialog window, see screenshot below. Here you can put in your username and password to log on to obtain a new session ID.
Since the session ID is linked to your account, anyone got hold of it will be able to use your account to submit simulations, and access your submitted jobs. So please make sure your session ID is kept safe. Please note that copying the client program folder will copy the current session ID with it. This is a convenient way for moving the Client from computer to computer, but risks leaking the session ID at the same time.
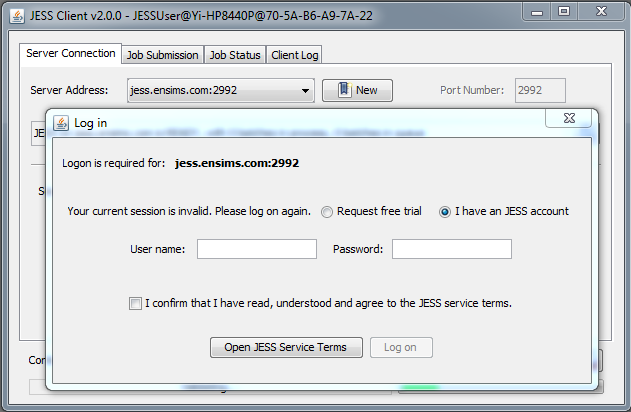
Log on dialog window
Please note from v2.0, you can request a free trial account from the client GUI. This is a temporary account with certain limitations attached. Its purpose is to let test and experience the service before getting your own account. To get your own account, please fill out the request form.
On the bottom of the Client GUI window, you can see what the Client is doing and its progress. If the Client seems to be locked and unresponsive, it may be waiting for a transaction to complete, in which case please wait for it to finish.
Job Submission
The Job Submission tab is for selecting, configuring and submitting a job. A “job” here may be either a jEPlus project (the JEPLUS_PROJECT type) or an EnergyPlus simulation case (the STD_SINGLE_JOB type). The third job type, i.e. JEPLUS_JOB_SET, is reserved for advanced users and is not discussed here.
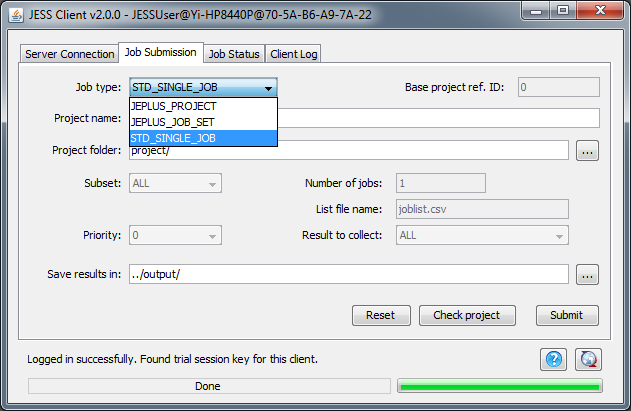
Job Submission tab
Whichever job type is selected, the Client will transfer the contents of the selected whole project folder in the submission. It is important to make sure that the project folder contains only the necessary files for the particular job type, to avoid waste of internet communication bandwidth.
STD_SINGLE_JOB
The EnergyPlus simulation job type requires only two files in the project folder: in.idf and in.epw. Full EnergyPlus simulation output will be retrieved and put in the specified output folder.
JEPLUS_PROJECT
The jEPlus project job type is slightly more complex. The project folder must contain all files required for the jEPlus project, with the project file itself named as project.jep. The rules for preparing a jEPlus project for submission are summarized here:
- All the files used in a jEPlus project must be stored within the project folder. These files normally include IDF models, weather files, RVI/MVI file, and so on. Sub-folders can be used, as long as they all reside within the project folder.
- The jEPlus project file must be named project.jep (all letters in lower case), and located in the root of the project folder.
- Within the jEPlus project, and in the IMF models containing included parts, all paths used must be in relative forms.
For an example, the screenshot below shows the selected project folder “D:\IKDocs\Desktop\TestProject\”
The contents of the project folder (see screenshot below) include “Test.imf”, “my.rvi” and “project.jep”. In addition, there are two sub-folders: “include”, which contains included parts of “Test.imf”, and “weather”, which contains the weather file.
Figure below also shows how the relative paths are specified in the jEPlus software in the example project. More about relative paths can be found on the following Wikipedia page. Please note that you must use the forward slash (‘/’) character instead of the backward slash (‘\’) character in path names.
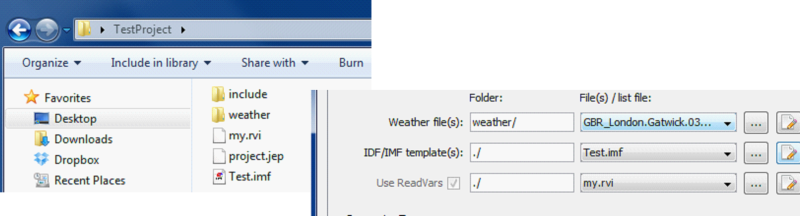
If an EP-Macro is used in the jEPlus project to incorporate external files into the main EnergyPlus file (which is the case in the above mentioned example) than a relative path to external files has to be used in a main EnergyPlus input file. Relative path is relative to the location of the original input file.
Project Options
“Subset” drop-down list offers four options to define the number of simulations to be executed on the server:
- ALL – all jobs in the project will be simulated
- RANDOM – a random sample of all jobs specified in the project will be executed. There is a limit on both the sample size (2,000) and the project size (107) on this option. The reason for the limitation is that the server has to create all jobs before taking a sample. The number of randomly selected jobs to be simulated can be specified in the “number of jobs” field.
- LHS_SAMPLE – a random sample of the solution space (which may or may not be identical to all jobs specified in the project) using Latin Hypercube Sampling method. The number of jobs to be simulated can be specified in the “number of jobs” field.
- LIST_FILE – a list of jobs specified in a CSV file (e.g. “joblist.csv”). Please note the file as name in the “List file name” field must be located in the same folder with “project.jep”.
Result Collection Options
“Result to collect” drop-down list manages the option for result collection. There are three levels of results:
- SUMMARY_TABLE – collects only the three summary files (RunTimes.csv, SimJobIndex.csv and SimResults.csv). This is a default and recommended option.
- RESULTS – in addition to the summary tables, also collects individual job folders containing EnergyPlus input file (“in.idf”), raw result file (“eplusout.eso”), extracted result file (“eplusout.csv”), and E+ error report files (“eplusout.err” and “eplusout.end”). This option will be useful for diagnostic purpose, especially when jobs work ok on your local computer, but fail on the server. Make sure you select and run a small sample, though.
- ALL - collects back all outputs generated by EnergyPlus for each individual simulation. This option will result in the largest download size.
We would like to stress that the “RESULTS” or “ALL” output levels must be used with care. EnergyPlus simulations can generate large amount of outputs. Requesting individual job results can easily lead to slow simulation speed and gigabytes of results to download.
Downloaded results will be stored in the location specified by the “Save results in” field. Keeping the default option (../output/), results will be collected to the “output” folder located one level above the folder where the jEPlus project file is. Take care NOT to put downloaded results inside the project folder, otherwise the next time you submit the project, all downloaded results will also be uploaded to the server. If the output folder does not exist, the Client will create it.
Submit Job
By clicking on the “Check project” button some basic checks on the job to be submitted will be carried out. Please note this check is simplistic and does not guarantee that the job will be simulated successfully on the JESS server.
The job is submitted to the JESS server by clicking on the “Submit” button. A job number is assigned to the submitted job, if successful. Please take note of this number, and use it as a reference in correspondence with the jEPlus team regarding any issues with the submission.
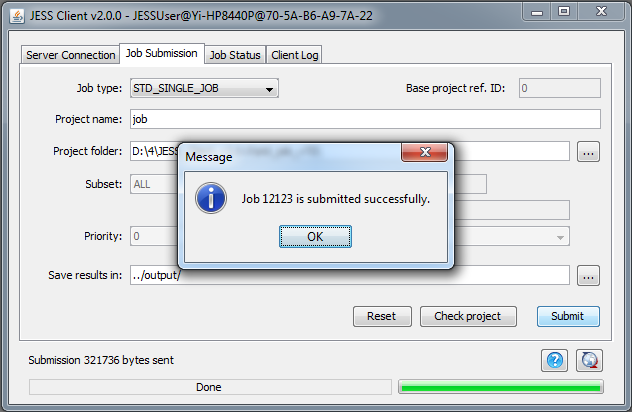
Job submitted
Job Status
The status of the existing submissions can be checked on the “Job status” tab. “Status” and “Server message” fields give you information about the status of the submissions. You can manually check each submission, or tick the “Auto refresh” box. Other parts of the tab are fairly self-explanatory.
Once all simulations of a submission are completed on the server, and the client has retrieved the results, the job status will read “FINISHED”. You should be able to find the simulation results in the output folder you specified earlier. Please note JESS Client will collect results only once. So, make sure they are stored safely on your computer, and not getting overwritten by other projects.

It is safe to close JESS Client once jobs are submitted. Submitted jobs will continue to execute on the server, and once they finish, results will be awaiting to be collected. The next time you start JESS Client, go to the “Job Status” tab and click on the “Refresh All” button, it will retrieve all results.
Client Log
The Client Log tab shows the communications between the client and the JESS server. Same information and a log of errors occurred can be found in the client.err file in the client program's folder.
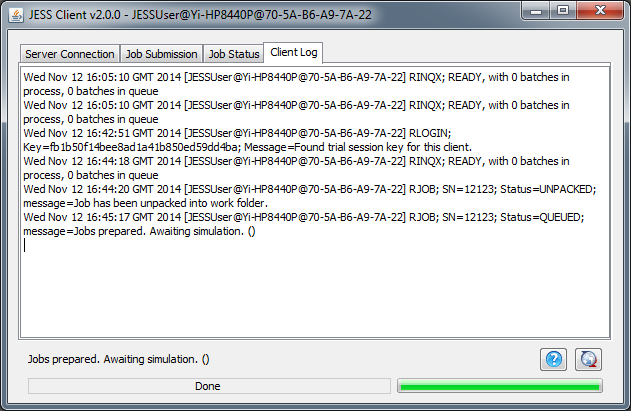
Client Log tab
Use Command-line
Using its command-line options, the JESS Client can be coupled or integrated with third-party tools for remote simulation. This section provides the full description of the functions provided in this way.
Full Options
Full command-line options of the JESS Client are as below.
usage: java -jar JESS_Client.jar [OPTIONS]
 -cancel <job id>                   Cancel a previously submitted job using the
                                    job id, or 'all' to cancel all pending jobs
 -cfg <config file>                 Client configuration file.
                                    Default=./client.cfg
 -check <job folder>                Check the folder contains job files
 -checkin                           Check in to JESS server with the existing
                                    user details
 -dbonly                            Use DesignBuilder specific actions and
                                    output; effect only with -version, -checkin,
                                    -retrieve and -job
 -gui                               Run in GUI mode. This option defeats other
                                    options except -cfg and -log
 -help                              print this message
 -job <job folder>                  Folder contains job files
 -log <Log configuration>           Logger configuration file.
                                    Default=./log4j.cfg
 -logon                             Show the log on window for choosing a JESS
                                    server to use
 -output <output folder>            Output folder to store results
 -ref_project <job id>              Job id of the submission that contains full
                                    project data
 -result <retrieval type>           Result to retrieve. Options are
                                    SUMMARY_TABLE (default), RESULTS, ALL
 -retrieve                          Retrieve results of previously submitted
                                    jobs only
 -subset <subset type>              Subset type. Options are ALL (default),
                                    RANDOM, LHS_RANDOM, LIST, LIST_FILE
 -subset_param <subset parameter>   Subset parameter. For RANDOM/LHS_RANDOM, it
                                    is sample size. For LIST/LIST_FILE it is a
                                    string containing jobs or a filename
 -type <job type>                   Job type. Available options are
                                    JEPLUS_PROJECT, JEPLUS_JOBSET,
                                    STD_SINGLE_JOB
 -version                           Get version string of this client
For example, to check the version of the current Client, use:
java -jar JESS_Client.jar -version
Or to start the Client in GUI mode, use:
java -jar JESS_Client.jar -gui
Further functions are explained next.
Check Connection
The Server Connection setting described in the GUI section can be shown in a separate window for user to configure accounts, as seen in the screenshot below. An application example can be found in DesignBuilder V4. The command-line for starting this function is:
java -jar JESS_Client.jar -logon

Check Session ID
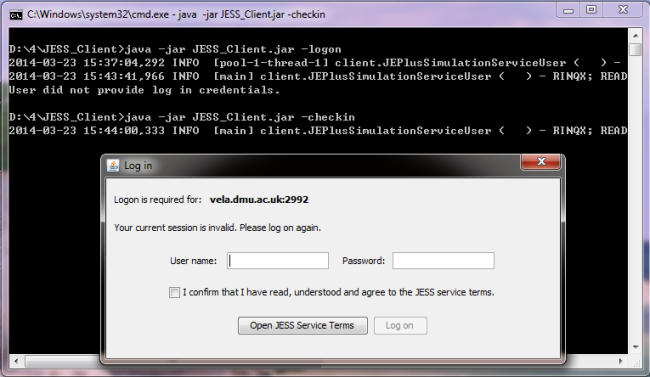
The validity of the user's current session ID can be checked using the “-checkin” argument. If the session is valid, the command will terminate without further actions. If it is not, the log on dialog box will be shown for user to put in user name and password, as shown in the screenshot below. The command-line for starting this function is:
java -jar JESS_Client.jar -checkin
Check Project
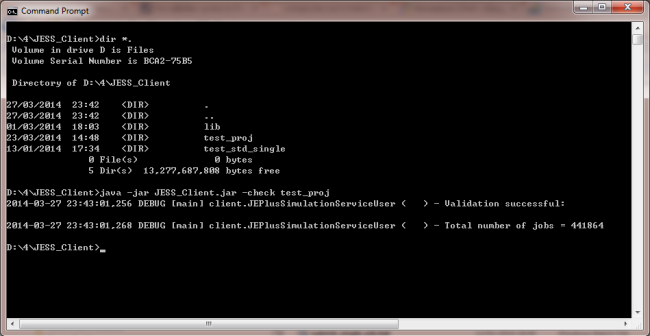
Check project takes to project folder as the input argument. The client read the project.jep file in the specified folder, runs project validation, and also reports the number of simulation cases found. Below is an example and the output.
java -jar JESS_Client.jar -check test_proj
Submit Jobs
The command-line below submits a single EnergyPlus simulation. The model and weather files, must be named in.idf and in.epw, respectively, are stored in the folder std_job_v72/. The simulation results will be put in the same folder as the model files after simulation.
java -jar JESS_Client.jar -job std_job_v72 -type STD_SINGLE_JOB -output ./
The next example submits a jEPlus project stored in the example_E+v8.1/ folder. Only a random sample (using LHS) of 10 cases in the project will be executed. Only the results in the jEPlus summary tables will be retrieved when simulations finish. The results will be put in the output/ folder in parallel to the project folder.
java -jar JESS_Client.jar -job test_proj -type JEPLUS_PROJECT -subset LHS_RANDOM -subset_param 10 -result SUMMARY_TABLE -output ../output
Please note that the output folder paths, if in relative forms as in the examples above, are relative to the job folders. For E+ jobs, they are relative to the folder where “in.idf” and “in.epw” are. For jEPlus projects, they are relative to the location of where “project.jep” and the other project files are.

Once submission is confirmed, you are free to close the terminal window. The next time when the client is run, it will try to retrieve results.
Retrieve Results
To retrieve results for previously submitted jobs, use the command below. The Client keeps records of all submitted but unfinished jobs, and it will try to retrieve results of all pending jobs.
java -jar JESS_Client.jar -retrieve
Cancel a Job
To cancel a previously submitted job, use:
java -jar JESS_Client.jar -cancel 12345
“12345” is the job number of the job submitted earlier.
Call the client from a different folder
Sometimes it is useful to call the client from a different folder than where JESS_Client.jar is. To do that, you need to specify explicitly the location of the client.cfg and the log4j.cfg files, by including two extra arguments in the command-line. For example, to submit an E+ job from the current folder, i.e. from where in.idf and in.epw are, and the client is installed in C:\jess_client\, use the following command.
java -jar JESS_Client.jar -cfg c:\\jess_client\\client.cfg -log c:\\jess_client\\log4j.cfg -job . -type STD_SINGLE_JOB -output .