meta data for this page
Chapter 3 The jEPlus Project
3.1 Input files
Weather file(s) – The weather files (EPW files) to be used in the simulation can be selected by pressing the 'select' button. You can select multiple weather files (by holding the 'Ctrl' or the 'Shift' key) as part of the parametric study. If you want to run your model(s) with a long list of weather files, you can put the file names (including paths) in a text file and select it as the input. In this way you can reference weather files in different folders, which is not possible with the file chooser.
IDF/IMF template(s) – These are building models on which the parametric study will be carried out. Parts of the model are replaced with search strings associated with the parameters. You should always test the model thoroughly with the correct version of EnergyPlus, before putting in the search strings. To edit the template, either a text editor or the in-built IDF text editor can be used. However, the IDFEditor of EnergyPlus cannot be used to insert search strings. You can use the select button to select IDF and/or IMF files as model templates of the project. Hold the 'Ctrl' or the 'Shift' key to select multiple files in the file selector dialog window. If you have many model templates and/or they are in different folders, you can list them in a text file (with a “.lst” extension), with one IDF in each line, and select it here as input.
RVI/MVI/RVX file – in the EnergyPlus package, a utility (ReadVarsESO, see E+ Documentation) for extracting variable and meter values from the E+ output files (“eplusout.eso” and “eplusout.mtr”) is provided. It will produce a more usable data table in CSV format. To use this utility, you need to specify a RVI or MVI file, which defines the source and variables to be extracted with ReadVarsESO. See next for more particulars of this file.
3.2 Parameter tree
jEPlus provides a slightly complex but powerful way to manage the definitions of the parameters and their alternative values. A tree structure is used to identify the hierarchical order of the parameters. In theory, user can define almost any problem with this approach.
Traditional parametric studies are designed for analyzing sensitivity of a model to a number of independent parameters. In engineering design however, investigations of the effects of different combinations of dependent parameters are often required. For example, to study the effect of window sizes, four parameters have to be considered together: the coordinates (x, y) of one corner, and the height and width of the window. The choices of the four values are constrained by the geometry of the wall, as well as the overall size (in m2) of glazing. To encode the dependency between parameters, a Tree structure is necessary.
The definition of window size parameters is not a particularly good example because it can be easily handled using one parameter (e.g. the glazing ratio in DesignBuilder) with some pre-processing. However, this example is used to explain the concept of the Parameter Tree.
Assume that, on a 5x3m2 wall, the impact of glazing area is to be evaluated. The lower edge and the height of the window are fixed to 1.0m and 1.5m, respectively. There are two adjustable parameters, the left edge (x) and the width (w). The two parameters are constrained by the width of the wall (5m). For example, if x=2m, 0m < w < 3m. Now consider x is varied between 1.0m and 2.0m at a step of 1.0m; whereas w is also varied at a step of 0.5m, the values set can be represented as: {{x=1.0, w={0.5, 1.0, …4.0}}, {x=2.0, w={0.5, 1.0, …3.0}}} (note that this is not jEPlus syntax).
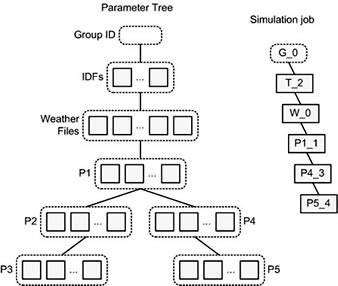
It can be presented as part of the Tree structure in Figure 7, i.e. P2 represents x with value {1.0}; P3 represents w with alternative values {0.5, 1.0, …4.0}; P4 represents x with value {2.0}; and finally, P5 represents w with alternative values {0.5, 1.0, …3.0}. A traverse of the tree will give us all combinations of the alternative values of the parameters.
Figure 3.1 illustrates the full structure of the Parameter Tree used in jEPlus. The first three nodes in the tree, i.e. the Group ID (identified by “G” + user-specified integer), the IDFs (“T”) and the Weather Files (“W”) are implicit and default to all projects. Here is an example job id: G_0-T_0-W_0-P1_19-P2_2-P3_1

Each simulation job is a path from the root node of the tree to a leaf (the end of a branch) of the tree, with each node containing an optional value of the corresponding parameter. As a result, the total number of jobs encoded in the tree equals the total number of paths from the root to the leaves.
3.3 RVI/MVI file
ReadVarsESO is another essential tool to use with jEPlus. It extract data of user selected variables from the standard EnergyPlus output files (eplusout.eso and eplusout.mtr) and reformat it as a CSV file. The details of how to use ReadVarsESO can be found in EnergyPlus documentation. In jEPlus, you need to specify a RVI or MVI file, which contains the name of the EnergyPlus output file (either eplusout.eso or eplusout.mtr), the name of the output CSV file (must be eplusout.csv), a list of output variables to extract, and a 0 in the last row to mark the end of the file. List below shows an example of the file.
eplusout.eso
eplusout.csv
InteriorLights:Electricity
InteriorEquipment:Electricity
Heating:DistrictHeating
Cooling:DistrictCooling
0
The available output variable names of your model are reported in eplusout.rdd and eplusout.mdd (or your_model_name.mdd/rdd, if you simulated the model with EP-Launch) files. Below is (part of) an example eplusout.mdd file, in which you can see where the variable names are specified. Please note the variables must be specified for output at the desired frequency in the IDF model, too.
Program Version,EnergyPlus-32 7.0.0.036, 06/06/2013 20:46,IDD_Version 7.0.0.036
Var Type (reported time step),Var Report Type,Variable Name [Units]
Zone,Meter,Electricity:Facility [J]
Zone,Meter,Electricity:Building [J]
Zone,Meter,Electricity:Zone:SPACE1-1 [J]
Zone,Meter,InteriorLights:Electricity [J]
Zone,Meter,InteriorLights:Electricity:Zone:SPACE1-1 [J]
Zone,Meter,GeneralLights:InteriorLights:Electricity [J]

...
Since jEPlus version 1.5, a new RVX file is introduced to provide a more flexible and robust solution to result extraction. The RVX file allows multiple RVI files, SQL commands (for reading E+'s SQLite output) and Python scripts to be specified. Full details are provided in Chapter 5.
3.4 Project validation
Click on the [Validate] button to check the current settings and jobs. This function provide simple checks on the directory/input settings, parameters and jobs in the following order:
- EnergyPlus executables are accessible
- Working directory and input files are accessible
- Parameter tree structure, parameter names and search strings comply with relevant rules
- Compilation of job group is successful (this validates the alternative value syntax of the parameters)
- Reporting number of jobs identified, including a list parameter chains
- The validation process DOES NOT verify the model templates, including the presence of search strings, E+ version, or references to the inclusion files (see 6.4 Working with EP-Macro).
- If the composition is valid, a message box (Figure 3.2) will appear to show the number of jobs found in the compiled job group. “Start simulation” button will be subsequently enabled. If there is an error, the message box will provide some diagnostic information to help your locate the source.

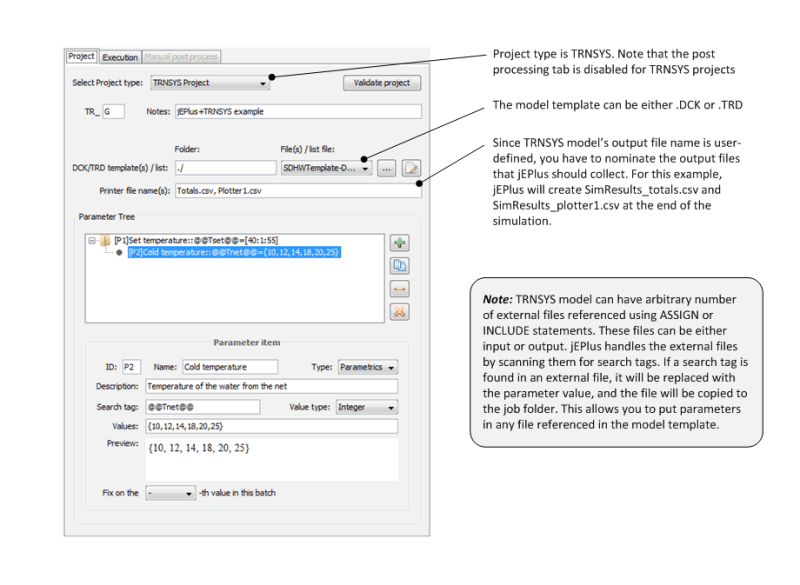
3.5 TRNSYS Parametrics
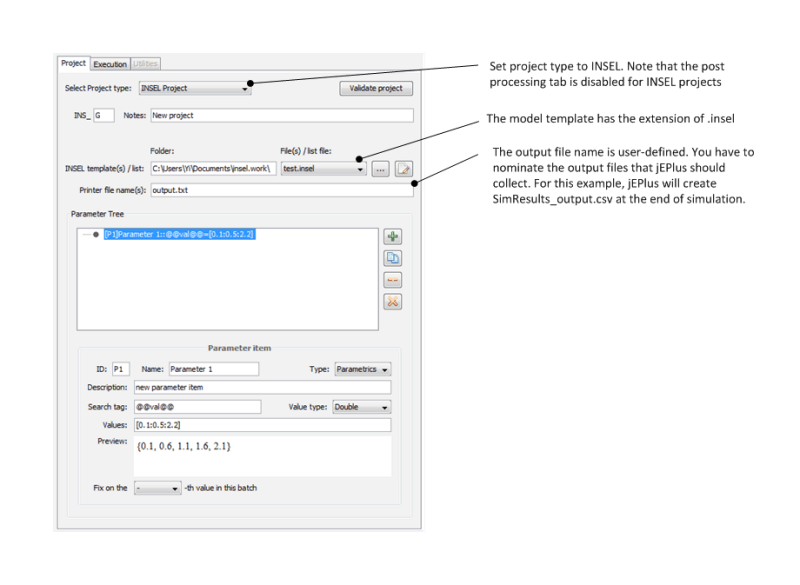
jEPlus can create parametric projects for TRNSYS and INSEL, and run simulations in parallel. The mechanism is more or less the same as with EnergyPlus, except that the output file names are user-defined in TRNSYS or INSEL models. As a result, you will need to specify which output file(s) jEPlus should collect after running the simulations. Please bear in mind that jEPlus can only collect files in CSV format, with the first row containing column names. Below is the TRNSYS project tab and the INSEL project tab:

