meta data for this page
jEPlus User's Manual
Version 1.2, © 2011, 2012
Dr Yi Zhang, IESD, De Montfort University, Leicester, LE1 9BH, United Kingdom
Disclaimer
This software is provided by Dr Yi Zhang free of charge for commercial or non-commercial use. It is provided on the basis of “as is”. Any express or implied warranties, including, but not limited to, the implied warranties of merchantability and fitness for a particular purpose are disclaimed. In no event shall Dr Yi Zhang or his employer be liable for any direct, indirect, incidental, special, exemplary, or consequential damages, (including, but not limited to, procurement of substitute goods or services; loss of use, data, or profits; or business interruption) however caused and on any theory of liability, whether in contract, strict liability, or tort (including negligence or otherwise) arising in any way out of the use of this software.
The use of this software is done at your own discretion and risk and with agreement of the foregoing disclaimer.
1. Introduction
Parametric analysis is often needed for exploring design options, especially when a global optimization method is not available, or the optimization result is in doubt. Parametric analysis can also be applied to all design variables simultaneously, which forms an exhaustive search that, on a fine mesh, guarantees the discovery of the global optimum solution. To perform complex parametric analysis on multiple design parameters, a tool is needed to create and manage simulation jobs, and to collect results afterwards. jEPlus has been developed for this purpose.
The main features of jEPlus version 1.2 include:
- GUI designed for setting up and managing parametric simulations with EnergyPlus, as well as collecting results into CSV tables
- Command-line and programming interfaces for using jEPlus as an EnergyPlus simulation controller (since version 1.1)
- Parametric projects can be saved in text (XML) format, which is editable and portable accross platforms.
- Parameters are organized in a tree structure that reflects dependencies between the parameters
- Flexible syntax for specifying alternative values, including importing from files and random sampling from specified probablistic density functions
- Parameter definitions can be imported from a CSV-styled text file, making the task of editing many parameters easier (since version 1.2)
- Supports multi-processor/multi-core systems; easy to choose the number of processors to deploy
- Supports Windows/Mac/Linux versions of E+; supports EP-Macro and HVACTemplate objects
- In-built text editor supports basic syntax highlighting for IDF/IMF files, quick location of parameter search strings, and incremental search functions
- Simulation results collected in one CSV file (using ReadVarsESO), with options to remove E+ outputs and other intermediate files to save storage space
- Post-processing tab for collecting and compiling results table without reruning the simulations. Simple statistics (mean, sd, min and max) can be performed during result collection. (since version 1.1)
2. How jEPlus works
In a nutshell, you select a building model (an IDF or a set of IMF files) and put search strings in the places of the parameters; specify all alternative values for the parameters in jEPlus; jEPlus will then pick a set of values and put them in the right places in the building model and call EnergyPlus. In this way, you can quickly set up large amount of simulation runs to explore the design options.

Some key concepts/terminology of jEPlus is explained here:
jEPlus Project - a jEPlus project contains all nessesary information that defines the parametric study. These information include: a list of model templates, a list of weather files, one RVI or MVI file, the parameters tree, and simulation settings such as the working directory, number of processors to deploy, and options to keep or remove temporary files and EnergyPlus outputs.
Model template – an IDF (.idf) file or a set of IMF (.imf) files that contains search strings (see next). A template should be based on a working EnergyPlus building model.
Search string – a specially formulated text string that are not normally occurring in EnergyPlus files. Search strings are used by jEPlus to identify locations in the model to insert values for parameters.
Parameter – an element or aspect of the model that can have more than one options. A parameter can be a single design variable (e.g. a temperature set point), a component (e.g. the construction of an external wall), a sub-system (e.g. an HVAC system), and even the whole model (the model template can be regarded as a parameter). The weather file to be used in simulation can be a parameter, too.
An EnergyPlus job (a job) – a set of input files defining a model for EnergyPlus to simulate. These files typically include either an IDF, an IMF, or a set of IMF/IDF files, a weather file, and a RVI or MVI file. 'A job' can refer to a model to be simulated, or the process of a simulation.
Job ID - Each EnergyPlus job is named systematically, following a simple rule: G_[group/project id]-T_[template id]-W_[weather id]-[parameter 1's id]_[alt value id]-[parameter 2's id]_[alt value id]-…A job's id is a unique identification of the job within a project. It is also used for naming output directories of jobs.
A batch of jobs (a batch) – a collection of jobs of a parametric study. jEPlus creates batch jobs according to the batch configuration defined by the user and systematically names each job before carrying out simulations with EnergyPlus. Several methods are provided for creating a batch that is a subset of all jobs defined by the project.
Simulation options - these include the choice of simulation controller to use (only local batch controller is provided in this version), the number of processors (cores) to deploy, the working directory of the project, and options to keep/remove temporary files after the simulation.
Working directory - this is the directory in which jobs are prepared and results/output files are stored. In fact, the Working directory is the parent directory of the individual working directory of each job, named with the job id. After simulation, results will be collected from individual job directories and saved to a few result files in the Working Directory.
Simulation process – first jEPlus opens the model template and replace the search strings with corresponding values; if the template is an IMF file, jEPlus will create an 'in.imf' file. jEPlus calls EP-Macro to generate a 'out.idf' file; jEPlus then search through the new IDF file once more for search strings and produce the 'in.idf' file. EnergyPlus executables (including ExpandObjects.exe) are then called to run the simulation. Once finished, jEPlus calls ReadVarsESO to extract monitored variables from the simulation result, and combines the extracted eplusout.csv file for each job into a single result file 'SimResults.csv' in the working directory.
Output files – include intermediate, results and index files generated by either jEPlus or EnergyPlus during or at the end of the process. More details of these files can be found in Section 7.4.
jEPlus Input files – jEPlus allows you to use a text file as input at various places, such as specifying weather files, model templates, parameter values, parameter definitions, and selected jobs of a project. These input files are normally comma-delimitted text files, although each can have different format requirement. Please reffer to the corresponding sections on how to use these files.
3. Installation
Following the steps below to install (well, download and unpack, really) jEPlus:
- You will need a computer that supports Java (J2SE6.0 and above, available from java.sun.com) and EnergyPlus (version 2.2.0 and above, available from EnergyPlus). In order to use jEPlus, the resolution of your computer screen must be 1024×768 or higher
- The jEPlus distribution package, available from SourceForge
- Unpack the jEPlus package into a folder
- Start jEPlus by either double-clicking on the jeplus.jar file, using the supplied run.bat and run.sh files, or using the following command in a terminal window:
java -jar jeplus.jar
or if you have a large project (e.g. containing more than a few thousand jobs), use
java -Xmx1000m -jar jeplus.jar
- Your EnergyPlus models or test it with the example files provided. Please note the example files supplied in the jEPlus package are for E+ version 6.0, instead of the latest version 7.
4. The main Graphical User Interface
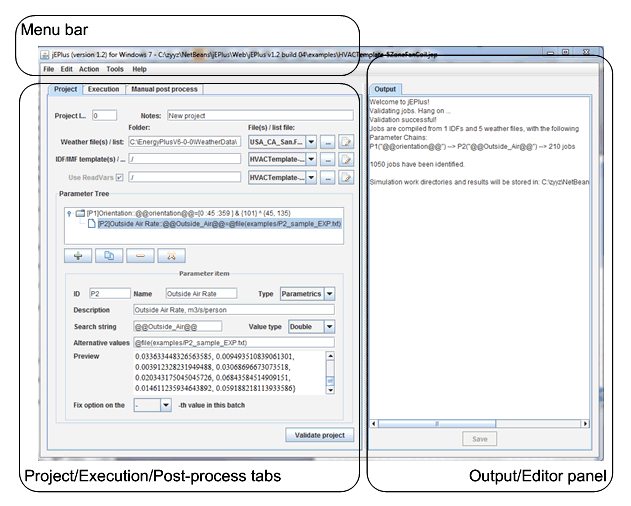
The main user interface of jEPlus is shown in Figure 2. Most of the controls are located on the Project/Execution/Post process tabs on the left side of the window, as well as in the new menu bar. On the right are panels for instructions, output, and file editors etc.
5. What's on the menu
Figure 3 shows what’s on the new menu bar (since ver.1.0). In ‘File’ menu, there are the usual ‘New/Open/Save’ commands. The jEPlus project file is now saved in XML format with extension ‘.jep’. The project is (just about) human-readable and can be edited with a text editor. If you have a project saved in ‘.obj’ format by jEPlus version 0.5, you can use the ‘Import OBJ file…’ command to open it, and then save it as a new ‘.jep’ project. An option is provided to save a project as OBJ file (Java's serialized object). However, the new OBJ format is NOT compatible with jEPlus v0.5.
In 'Edit' menu, you can import parameter definitions from a text file, or reset the parameter tree. Please note that it is NOT possible to 'Undo' or 'Redo' any actions in jEPlus.
In ‘Action’ menu, you can find 'validate jobs', 'run simulation' and ‘show post-process tab’ commands.
In ‘Tools’ menu, a few utilities such as viewing result files, jEPlus logs and error reports, and checking current memory usage, are provided. The 'memory usage' function is useful if jEPlus seems to stop responding after 'validate jobs' or 'simulate' a larger project. If the memory allocated to jEPlus is full, you will need to restart jEPlus with the '-Xmx1000m' option (see Section 3).

6. The 'Project' tab
jEPlus can help you manage complex parametric simulations. You will still need to plan a parametrics project carefully and do some preparations, e.g. testing the building model, choosing the parameters and the value range for each parameter, and, ultimately, deciding how to process the results. A good understanding of how EnergyPlus and its auxiliary tools (ExpandObjects, EP-Macro, ReadVarsESO) work will come in handy, too. In this section, we describe the 'Project' tab, and how to use it to design your parametric project, e.g. preparing input files, designing the parameter tree and defining parameters.
6.1 Input files
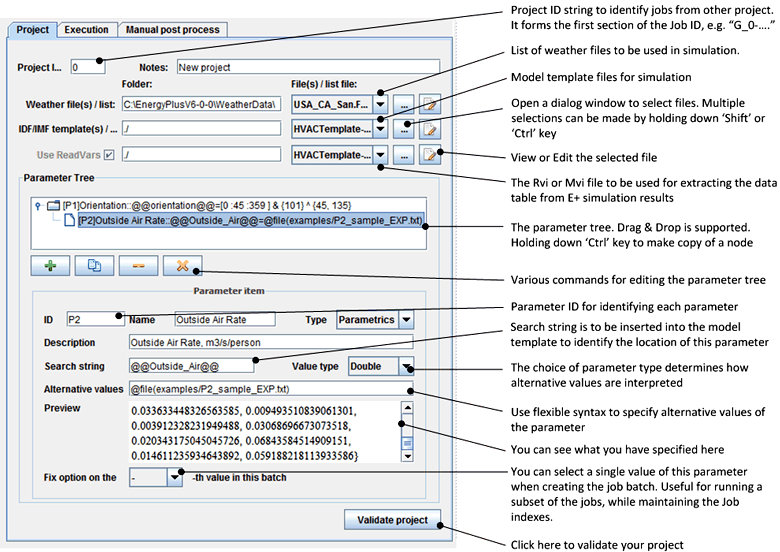
Weather file(s) – The weather files (EPW files) to be used in the simulation can be selected by pressing the 'select' button. You can select multiple weather files (by holding the 'Ctrl' or the 'Shift' key) as part of the parametric study. If you want to run your model(s) with a long list of weather files, you can put the file names (including paths) in a text file and select it as the input. In this way you can reference weather files in different folders, which is not possible with the file chooser.
IDF/IMF template(s) – These are building models on which the parametric study will be carried out. Parts of the model are replaced with search strings associated with the parameters. You should always test the model thoroughly with the correct version of EnergyPlus, before putting in the search strings. To edit the template, either a text editor or the in-built IDF editor (see 6.1.2) can be used. However, the IDFEditor of EnergyPlus cannot be used to insert search strings. You can use the select button to select IDF and/or IMF files as model templates of the project. Hold the 'Ctrl' or the 'Shift' key to select multiple files in the file selector dialog window. If you have many model templates or they are in different folders, you can list them in a text file, with one IDF in each line, and select it here as input.
RVI/MVI file – in the EnergyPlus package, a utility (ReadVarsESO, see E+ InputOutputReference) for extracting variable and meter values from the E+ output files (“eplusout.eso” and “eplusout.mtr”) is provided. It will produce a more usable data table in CSV format. To use this utility, you need to specify a RVI or MVI file, which defines the source and variables to be extracted with ReadVarsESO. See 6.1.3 for more particulars of this file.
6.1.1 Working with EP-Macro
EP-Macro is a powerful tool provided in the EnergyPlus package. Using jEPlus with EP-Macro, you will have more flexibility in designing the parameters:
Table 1: features of EP-Macro and potential applications
| EP-Macro features (from E+ documentation AuxiliaryPrograms.pdf) | Application of jEPlus with EP-Macro | |
|---|---|---|
| 1 | Incorporating external files containing pieces of IDF into the main EnergyPlus input stream | Defining a block of code in the building model as one parameter |
| 2 | Selectively accepting or skipping portions of the input | Another way for defining a block of code as a parameter |
| 3 | Defining a block of input with parameters and later referencing this block | Using one search string to change multiple values at different locations |
| 4 | Performing arithmetic and logical operations on the input | Calculating a variable value from an input value, therefore one parameter can be used in stead of two |
To use EP-Macro with jEPlus, however, the specific instructions bellow needs your attention:
- EP-Macro will be triggered if the model template file has an “.imf” extension
- If the model has inclusion files (i.e. '##include ' is used), rules regarding the location where you can insert search strings differ for the main IMF file and for the inclusion files
- In the main IMF file, search strings are allowed anywhere, either in the model code, or in macro instructions
- In the inclusion files, search strings are only allowed in model code. Search strings in macro instructions in an inclusion file cannot be processed by jEPlus; therefore errors will be reported by EP-Macro
- If “##include” and/or “##fileprefix” are used, absolute path to the folder location is recommended, for example: ##fileprefix C:\EnergyPlusV6-0-0\ExampleFiles\ If relative path is used, please bear in mind that it is relative to the location of the main IDF/IMF model.
6.1.2 Using the IDF Editor
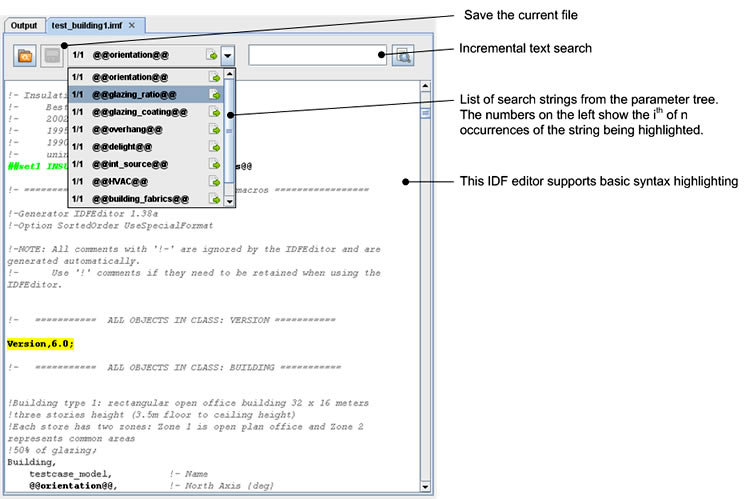
A simple editor (figure 5) is included in jEPlus for editing the model template. The editor can be opened by pressing the [Edit] button next to the IDF/IMF template box. Within the editor, apart from the open and save buttons, two search facilities are provided for locating the existing search strings as well as arbitrary text. To close the editor tab, click on the trash can. If found in the model, version information is highlighted to remind you to double-check the version of EnergyPlus executables you are using.
6.1.3 RVI/MVI file
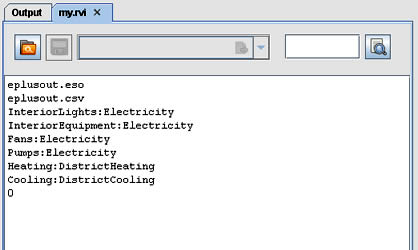
ReadVarsESO is another essential tool to use with jEPlus. It extract data of user selected variables from the standard EnergyPlus output files (eplusout.eso and eplusout.mtr) and reformat it as a CSV file. The details of how to use ReadVarsESO can be found in EnergyPlus documentation. In jEPlus, you need to specify a RVI or MVI file, which contains the name of the EnergyPlus output file (either eplusout.eso or eplusout.mtr), the name of the output CSV file (must be eplusout.csv), a list of output variables to extract, and a ‘0’ in the last row to mark the end of the file. Figure 6 shows an example of the file. To find out the output variable names of your model, simulate it once with EP-Launch of EnergyPlus, and take a look at the “(your model name).mdd” file in the output directory.
6.2 Parameters
jEPlus provides a slightly complex but powerful way to manage the definitions of the parameters and their alternative values. A tree structure is used to identify the hierarchical order of the parameters. In theory, user can define almost any problem with this approach.
6.2.1 Parameter tree
Traditional parametric studies are designed for analyzing sensitivity of a model to a number of independent parameters. In engineering design however, investigations of the effects of different combinations of dependent parameters are often required. For example, to study the effect of window sizes, four parameters have to be considered together: the oordinates (x, y) of one corner, and the height and width of the window. The choices of the four values are constrained by the geometry of the wall, as well as the overall size (in m2) of glazing. To encode the dependency between parameters, a Tree structure is necessary.
The definition of window size parameters is not a particularly good example because it can be easily handled using one parameter (e.g. the glazing ratio in DesignBuilder) with some pre-processing. However, this example is used to explain the concept of the Parameter Tree.
Assume that, on a 5x3m2 wall, the impact of glazing area is to be evaluated. The lower edge and the height of the window are fixed to 1.0m and 1.5m, respectively. There are two adjustable parameters, the left edge (x) and the width (w). The two parameters are constrained by the width of the wall (5m). For example, if x=2m, 0m < w < 3m. Now consider x is varied between 1.0m and 2.0m at a step of 1.0m; whereas w is also varied at a step of 0.5m, to encode this without arithmetic calculations, the following syntax have to be used: {{x=1.0, w={0.5, 1.0, …4.0}}, {x=2.0, w={0.5, 1.0, …3.0}}}.
It can be presented as part of the Tree structure in Figure 7, i.e. P2 represents x with value {1.0}; P3 represents w with alternative values {0.5, 1.0, …4.0}; P4 represents x with value {2.0}; and finally, P5 represents w with alternative values {0.5, 1.0, …3.0}. A traverse of the tree will give us all combinations of the alternative values of the parameters.
Figure 7 illustrates the full structure of the Parameter Tree used in jEPlus. The first three nodes in the tree, i.e. the Group ID (identified by “G” + user-specified integer), the IDFs (“T”) and the Weather Files (“W”) are implicit and default to all projects. Here is an example job id: G_0-T_0-W_0-P1_19-P2_2-P3_1
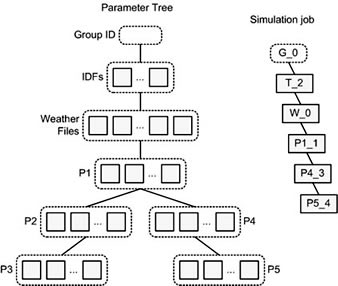
Each simulation job is a path from the root node of the tree to a leaf (the end of a branch) of the tree, with each node containing an optional value of the corresponding parameter. As a result, the total number of jobs encoded in the tree equals the total number of paths from the root to the leaves.
6.2.2 Parameter definition
A parameter to be incorporated in the parametric analysis is specified with three essential elements, a unique ID, a Search string, and a list of Alternative values. The ID is short string used for identifying the parameter. It is also used to form part of the job title as well as the work directory name in which the job is to be executed. The formulation of the job titles will be further explained in the “Result collection” section.
The Search string is a character sequence to be planted in the IDF files to identify the location of a value to be later inserted. This string must not naturally occur in an IDF file; therefore it is recommended to include special characters (e.g. ‘@’) that are not used in the standard EnergyPlus syntax. Note that jEPlus only search and replace one occurrence of a search string in each job. A user must ensure that there is only one instance of a search string, as well as all search strings in the IDF will be replaced within the job. A validation facility has been provided in the jEPlus GUI.
The “Alternative values” is a list of strings to be used one at a time in the parametric jobs. jEPlus supports three types of alternative values: Discrete, Integer and Double. The syntax for specifying the list of values is explained next. Figure 3 shows an example of parameter definition. There are two extra fields, i.e. “Name” and “Description”, which are recorded in the output files for reference, but not used in the simulation.
6.2.3 Syntax for alternative values
For the “Discrete” type of parameters, the values can be specified with a comma (‘,’) delimited list enclosed in a pair of curly brackets (‘{}’), e.g. {Detailed, Simple, CeilingDiffuser}. For the “Integer” and “Double” parameters, square brackets (‘[]’) and union/exclusion operations (‘&’ ‘^’) are accepted in addition to the curly brackets (‘{}’). The square brackets are used to define a number series with a uniform interval. For example, the list {1,3,5,7,9} can be specified using [1:2:9]. Colons (‘:’) are used to separate the Start Value, the Interval, and the End Value. Please note the last value in the resultant list is unnecessarily the End Value.
The union operator (‘&’) combines the elements in two lists. For example, [1:2:5]&{2,4,6} is equivalent to {1,3,5,2,4,6} (Note that the list is not sorted). The exclusion operator (‘^’) removes elements in the right-hand list from the left-hand list, e.g. [-2:1:6]^{2,4,6} gives {-2,-1,0,1,3,5}. The operators are processed in the left-to-right order. In the current version, grouping with parentheses is not supported. The following example shows the use of all supported operations: {1}&[0:5:30]^{0}, which gives {1,5,10,15,20,25,30} as the result.
6.2.4 Syntax for sampling and loading from file
Since version 1.0, it is possible to specify alternative values as random samples rather than a predefined sequence. Sampling can be performed on ‘Integer’ or ‘Double’ parameters with three distribution profiles, a uniform distribution, a Gaussian (normal) distribution, or a triangular distribution. The syntax for the sampling methods is illustrated with the following examples:
@sample(gaussian,0,2,20) gives 20 samples with Gaussian distribution (mean = 0, standard deviation = 2)
@sample(uniform,0,2,20) gives 20 samples with uniform distribution (lower bound = 0, upper bound = 2)
@sample(triangular,-1.0,0.2,1.0,20) gives 20 samples with triangular distribution (lower bound = -1.0, mode = 0.2, upper bound = 1.0)
Please note that sampling is performed right before the start of simulation. As a result, the values you see in the Preview box may NOT be what you get in the actual simulations.
If you want to use an external random sample generator, you can the list of generated values in a text file, and load them into the parameter, using the following syntax:
@file(examples/P2_sample_EXP.txt) of which ‘P2_sample_EXP.txt’ is provided in the ‘examples/’ directory in the jEPlus package. Please note that, if a relative directory name is used (as in this case), it is relative to the location where jEPlus is launched. If you don't see the content of the file in the preview box, try using absolute directory instead.
Unlike @sample(), @file() syntax works with any types of parameters.
6.2.5 Fix on a parameter value
Another feature of jEPlus, provided since version 1.0, is that you can choose to run only part of project, rather than all jobs in one go. One way to do this is by using the ‘Fix on the i-th value’ option of each parameter. Once selected, only jobs containing the particular parameter value will be included in the job batch. The Job IDs and indexes of the whole project are preserved in this way, allowing you to split a large project into smaller batches, and to merge the results later.
6.2.6 Import parameter definitions from text file
This is a new feature since version 1.2. You can now import the whole the parameter tree from a list of parameter definitions in a CSV-styled text file. An example parameter definition list file, as shown belown, is provided in the 'exampls/' directory. The import function creates only a single-branch tree. You can then edit it manually to achieve the right 'shape'.
# Parameter definitions in a csv file. Column headings are as below
# ID, Name, Parameter Type, Description, Search String, Value Type, Value String, Selected Value Index
#           {0}                                         {0, 1, 2}                 {0, .... depending on number of values}
# Please note , " or ' must not be used in data fields, e.g. "{1, 2, 3}" will cause errors; use { 1 2 3 } instead.
  P01, Orientation, 0, Orientation of the building, @@orientation@@, 0, [0:15:359], 0
  P02, OA, 0, Minimum fresh air, @@Outside_Air@@, 1, [0.008:.001:0.025], 0
# ...
6.3 Project validation
Click on the [Validate] button to check the current settings and jobs. This function provide simple checks on the directory/input settings, parameters and jobs in the following order:
- EnergyPlus executables are accessible (see 7.1)
- Working directory (see 7.2) and input files are accessible (see 6.1)
- Parameter tree structure, parameter names and search strings comply with relevant rules
- Compilation of job group is successful (this validates the alternative values of the parameters)
- Reporting number of jobs identified, including a list parameter chains
- The validation process DOES NOT verify the model templates, including the presence of search strings, E+ version, or references to the inclusion files (see 6.1.1 working with EP-Macro).
- If the composition is valid, a message box (Figure 8) will appear to show the number of jobs found in the compiled job group. “Start simulation” button will be subsequently enabled. If there is an error, the message box will provide some diagnostic information to help your locate the source.

7. The 'Execution' tab
7.1 EnergyPlus executables
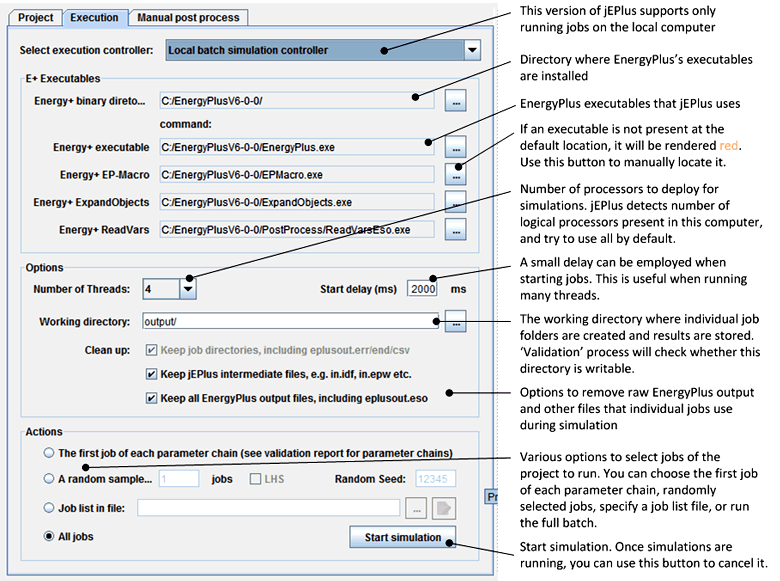
The EnergyPlus installation settings include the directory for EnergyPlus binaries, command for EP-Macro, EnergyPlus and ReadVarsESO. If the default location (to your platform) of EnergyPlus and the commands are invalid, the text will be rendered RED. In such case, please use the browse buttons to locate the correct directory and commands. Once you have finished locating the commands, simply close this window. Your settings will be saved in a text file named “jeplus.cfg”, which will be loaded automatically the next time you run jEPlus. Please note that jEPlus does not support any pre-processing or post-processing utilities other than those listed on the GUI (Figure 9). If your model requires certain data set in EnergyPlus’ directory, it may not work with jEPlus. Should this be the case, please contact Yi for a solution.
7.2 Start and Stop Simulation
Three methods have been provided to test a small number of jobs before running the whole lot. This will help check model templates and parameter settings. The second option, ‘Randomly sample N jobs’, randomly shuffles all jobs first, and then run the first N jobs in the new list.
To start the batch run of the whole project, click on the ‘Start simulation’ button. Apart from the progress report on the ‘Output’ tab, you can also monitor the progress by checking the job directories generated in the work directory. If you have selected to keep all temporary file, it will be possible to diagnose problems with each job by examining the EnergyPlus reports. jEPlus will generate two log files during the execution. “jeplus.err” contains critical errors related to the program itself, whereas “jeplus.log” tracks output from EnergyPlus tools, therefore is useful for identifying problems with the model and jobs.
Once simulation has started, the ‘Start simulation’ button will turn into ‘Stop simulation’, by pressing which, you can terminate the batch jobs. jEPlus will wait for jobs that are currently running to finish, and then try to collect results from completed jobs. You can also send ‘stop’ command from the ‘Action’ menu.
7.3 Result and Report Tables
EnergyPlus simulations can generate large amount of output. Rarely all of these information are required for (especially) a parametric study. A good practice is to define as few output as possible in the EnergyPlus models, and to extract exactly the information required for further analysis. jEPlus will collect CSV tables from each job directory, and compile a single table containing all results from the batch. The summary data table is named ‘SimResults.csv’ and is stored in the Work directory. Also stored are ‘RunTimes.csv’ and ‘SimJobIndex.csv’, which contain EnergyPlus simulation error count and CPU time, and the corresponding index table of the jobs.
Full Job Index files can be generated using the ‘Create Job Indexes’ command on ‘Tools’ menu. A number CSV files will be generated, along with a SQL script that creates all tables in the job index database.
8. A bit extra – the ‘Manual post process’ tab
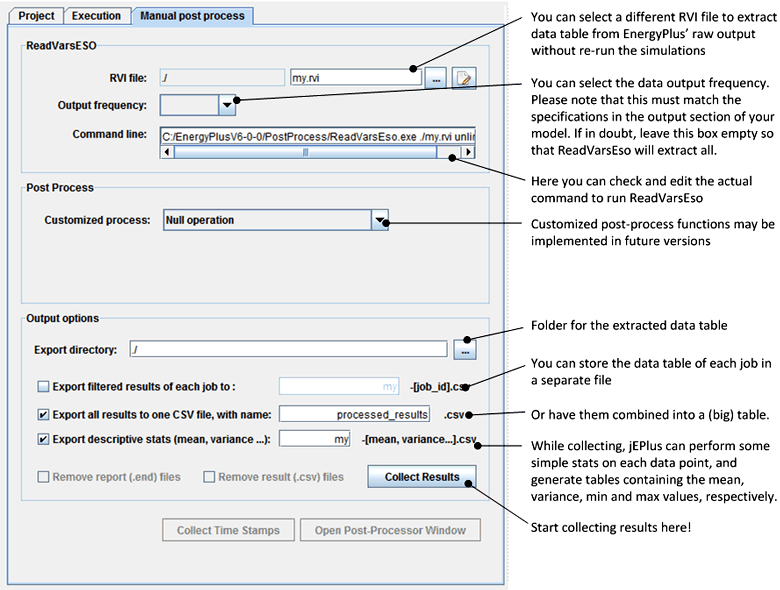
If you have kept the EnergyPlus output files after the simulations, you can extra a different set of data tables with the ‘Post process’ tab, without re-runing the simulations. Here, you can specify an alternative RVI/MVI file, and run ReadVarsESO. There are options to store data tables separately for each job, compile a combined table like jEPlus does by default, and perform simple statistics on the resutls.
9. Command-line and programming interface
Once the jEPlus project has been created and tested successfully, it can be saved as a text file in XML format, which is editable with a text editor. jEPlus can then be launched by a shell command, or via its programming interface.
9.1 Command-line options
The shell command:
java -jar jEPlus.jar -help
gives you the following instuctions:
jEPlus (version 1.2) for Windows XP (C) 2010, 2011, Yi Zhang, yizhang@dmu.ac.uk

Usage:
    GUI mode:   java [-Xmx1000m] -jar jEPlus.jar
    Batch mode: java [-Xmx1000m] -jar jEPlus.jar -batch {project_file_name.jep} [n random jobs]
    Job mode:   java [-Xmx1000m] -jar jEPlus.jar -job {project_file_name.jep}
                    -index|-value|-id|-file {job_string_1;...|job_id_1;...|job_file_name}

where,
    {...} required arguement, to be replaced with your own values;
    [...] optional arguement, to be replaced with your own values;
    '|'   separates alternative options.

For example,
    "java -Xmx1000m -jar jEPlus.jar -batch my_project.jep 1000"
               executes 1000 randomly selected jobs of the project in my_project.jep;

    "java -jar jEPlus.jar -job my_project.jep -id
           G_X-T_4-W_0-P1_11-P2_1-P3_1-P4_0-P5_0-P6_0-P7_0-P8_3-P9_2;
           G_X-T_3-W_0-P1_0-P2_1-P3_1-P4_0-P5_0-P6_0-P7_0-P8_3-P9_2"
               executes 2 selected jobs (with the job IDs)of the project;

    "java -jar jEPlus.jar -job my_project.jep -index
           job0,0,0,12,2,4,0;
           job1,0,0,12,2,4,1;
           job2,0,1,12,2,4,0"
               creates three jobs with alt_value indexes and run them;

    "java -jar jEPlus.jar -job my_project.jep -value
           job0,0,0,135,non-reflective,CAV,24.5"
               creates one jobs with the specified parameter value and run it.

    "java -jar jEPlus.jar -job my_project.jep -file my_job_list.txt"
               creates and executes jobs from the job strings list in the specified file.
               The job strings in the file must be in -value format and separated by either
               ';' or end-of-line.
Text in ‘{ … }’ should be replaced with the actual jEPlus project file name and the job strings. The formats of job string will be explained in the next section; different job strings are separated by ‘;’.
On this command, jEPlus starts simulations immediately. When all jobs are completed, extracted results are collected into the ‘SimResults.csv’ file in the output directory specified in the project file. jEPlus then exists normally with a value ‘0’.
9.2 Programming interface
The following example shows how to use the jEPlus programming interface in Java language:
  // ... ...

  // load project file
  JEPlusProject Project = new JEPlusProject (/* "project.jep" */);

  // create simulation manager
  EPlusBatch SimManager = new EPlusBatch (null, Project);

  // Set simulation agent
  SimManager.setAgent(new EPlusAgentLocal ( Project.getExecSettings()));

  // specify jobs
  String [][] jobs = /* array of job strings */;

  // execute jobs – job string contains values
  SimManager.runJobSet(jobs);

  // or if job string contains indexes
  // SimManager.runJobSet2(jobs);

  // wait for jobs to finish
  try {
      do {
          Thread.sleep(2000);
      }while (SimManager.isSimulationRunning());
  }catch (InterruptedException iex) {
      SimManager.getAgent().setStopAgent(true);
  }

  // collect simulation results
  HashMap<String, ArrayList<double []>> Results =
       SimManager.getSimulationResults();

  // ... ...
Here, simulation results can be retrieved directly from the simulation manager instance as a map indexed by the job IDs. A job ID is a unique string that a user must assign to each job as the first part of the job string.
9.3 Job string
A jEPlus job string takes the following form:
{job ID},{index of weather file},{index of building model}, {value of parameter 1}, {value of parameter 2}, …;
Or, in the index form:
{job ID},{index of weather file},{index of building model}, {index of parameter 1}, {index of parameter 2}, …;
in which, job ID is a unique string assigned to the job; the index of weather file or building model is zero-based sequential number of the selected file in the corresponding list in the jEPlus project.
Specification of a parameter value can take two forms: as the actual value or as the index (zero-based) of the value in the alternative values list of the parameter in question. The first form is suitable for real value encoded optimisation algorithms, and indeed, for any job creator that a user wants to employ, for instance, for implementing user defined sampling methods, uncertainty analysis, or sensitivity analysis purposes.
The second form relies on the predetermined alternative value lists of the parameters. It is suitable for use with integer-encoded algorithms, which will be demonstrated in the next section. It worth noting that the job strings, in either value or index forms, are NOT validated by jEPlus before execution.
10. Contact
I hope you will enjoy using jEPlus. Should you have any enquiries or comments, or like to report issues and request new features, please feel free to contact Dr Yi Zhang at De Montfort University, UK: yizhang@dmu.ac.uk
References
Zhang, Y., Korolija, I (2010) “Performing complex parametric simulations with jEPlus”, SET2010 - 9th International Conference on Sustainable Energy Technologies, 24-27 August 2010, Shanghai, China
Zhang, Y. (2009) “‘Parallel’ EnergyPlus and the development of a parametric analysis tool”, IBPSA BS2009, 27–30 July 2009, Glasgow, UK